
Inputs Exploration
- For each of the steps below, delete the code currently in the
“code” file. Then copy and paste the code from the step you're on into the “code” file. Finally,
click “Save” to run the code on your device.
- Do some code tracing! Take a little time as you copy the code into your Mu Editor to try to understand what the code is doing. Later you will need to write code yourself.
-
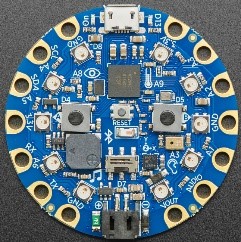
The code below turns the LED next to the USB cable on and off depending on the switch's position. Note: the LED may be green or red depending on your bluefruit. If you don't know where the switch is, click "Bluefruit Board" button >>>
-
The code below displays “Button A pressed” or “Button B pressed” to the console in the Mu editor depending on which button you currently have pressed. Remember to have the Serial and Plotter options selected in Mu (Serial is the console).
 The code below displays “Touched pad A#” to the console in Mu depending on which capacitive sensor you are currently touching.Try touching the different pads and make sure you see both the messages.The code below displays the light level detected by the light sensor. Cover the light sensor, or shine your phone light on the light sensor, and watch the values change in the Mu serial window.Note: Observe that we are using the time module below. What does the line time.sleep(1) do?The time.sleep(1) line is making the program pause for 1 second before continuing to the next step. In this case, it waits for 1 second after printing the light sensor value before printing the light sensor value again.The code below displays the x, y, and z acceleration values in meters per second. Explore tipping the board in different directions and see how the x, y, and z values change in the console and the plotter windows.The code below detects the magnitude of sound picked up by the microphone. Explore making different sounds and watch the magnitude of the volume change in the console and the plotter windows.The code below detects the temperature in degrees Centigrade, converts it to degrees Fahrenheit, and then displays and plots that value.
Outputs Exploration
- For each of the steps below, delete the code currently in the “code” file you opened in step 3 of the Learning to Use Your Board section. Then copy and paste the code from the step you're on into the “code” file. Finally, click “Save” to run the code on your device.
- Again, do some code tracing! Take a little time as you copy the code into your Mu Editor to try to understand what the code is doing. Later you will need to write code yourself.
-
This code sets up and displays the 10 NeoPixels on your Bluefruit board. Remember that the led[0] is the NeoPixel to the left of the USB port on your board and the numbering goes counterclockwise from there. Practice changing the NeoPixels' colors (any value between 0 and 255). Understand which NeoPixel corresponds to which led[#] in the code above.
-
The code below plays a 440hz tone for 1 second using the built in speaker.
TFT Gizmo Display
-
This code creates a gray square within a black square and displays the text "Go Army! Beat Navy!", followed by "Beat Air Force!", followed by "Beat Everyone!" (each option is shown for two seconds at a time)
How does the display work? -
This program is a memory game. The display will show "A" or "B", then wait for you to press Button A or B, respectively. Next, the display will show a second "A" or "B", and you will need to enter the new sequence of As and/or Bs. This process continues until you either enter the wrong sequence (you lose) or reach a sequence that is 10 A's and B's long (you win). Try modifying the max_length variable in Line 79 to allow for a longer winning sequence length. Also, try modifying lines 71 and 73 if you want the sequence of letters to display faster for you to memorize.
-
Drag the EECS.bmp image from the Circuit Playground Lab Files folder into the CIRCUITPY drive and then run the code below.
to see how to get the bitmap on the board. This code display a bitmap (.bmp) file on your LCD. Note: the files can at most be 240x240 pixels.
Sensor Activities (GRADED)
You will be graded on your successful completion of the activities below. Starter code is provided; however, it is necessary to modify the code to complete the task. Use your experience with Python programming concepts (iteration, conditionals, order of operations, functions, etc.) and the previous exploration examples to complete each task.
Once complete with each activity, verify it with your instructor. This is part of your grade! When complete with these graded activities, move on to the next section (Robotics).
Graded Sensor Activities-
Activity 2 (Choose ONE of the options below):
- Create a music player! Play a short song (at least 20 notes) using the built-in speaker (it must be an actual song, not just random notes). Consider how you could use multiple functions (and iteration) to make your song! Use the note frequency charts here: Frequency Chart . Hint: You probably want to work in Octaves 4 or 5!
- Create a photo album! Display three different images on your LCD. Each image should display for three seconds before going to the next image. Once your third image displays, it should loop back to the first and continue displaying these images until your device loses power. You can choose your own images (you'll need to scale them to 240x240 pixels and save them as bitmaps - you can do this with the Paint program.) or you can use the three images provided in the Circuit Playground Lab Files folder (click the 'Loading Images' button).
-
Activity 3:Create a nightlight with two modes: tactical and non-tactical! The only difference between tactical and non-tactical mode is the color of the NeoPixel lights. Use the switch to toggle between modes!
- Tactical mode: all NeoPixel lights red
- Non-Tactical mode: all NeoPixel lights white
Verify the completion of each activity with your instructor. This is part of your grade! Move on to the next section (Robotics) after you are done with these three Sensor Activities.